mkyun@mkyun-X7967T:~$ ifconfig
enp8s0f1: flags=4099<UP,BROADCAST,MULTICAST>  mtu 1500
        ether 80:fa:5b:79:be:e9  txqueuelen 1000  (Ethernet)
        RX packets 0  bytes 0 (0.0 B)
        RX errors 0  dropped 0  overruns 0  frame 0
        TX packets 0  bytes 0 (0.0 B)
        TX errors 0  dropped 0 overruns 0  carrier 0  collisions 0

lo: flags=73<UP,LOOPBACK,RUNNING>  mtu 65536
        inet 127.0.0.1  netmask 255.0.0.0
        inet6 ::1  prefixlen 128  scopeid 0x10<host>
        loop  txqueuelen 1000  (Local Loopback)
        RX packets 339  bytes 30867 (30.8 KB)
        RX errors 0  dropped 0  overruns 0  frame 0
        TX packets 339  bytes 30867 (30.8 KB)
        TX errors 0  dropped 0 overruns 0  carrier 0  collisions 0

wlp0s20f3: flags=4163<UP,BROADCAST,RUNNING,MULTICAST>  mtu 1500
        inet 172.17.6.55  netmask 255.255.248.0  broadcast 172.17.7.255
        inet6 fe80::c6c4:d46b:f88f:edf9  prefixlen 64  scopeid 0x20<link>
        ether 5c:80:b6:6a:ee:65  txqueuelen 1000  (Ethernet)
        RX packets 5519  bytes 5186465 (5.1 MB)
        RX errors 0  dropped 0  overruns 0  frame 0
        TX packets 3399  bytes 734594 (734.5 KB)
        TX errors 0  dropped 0 overruns 0  carrier 0  collisions 0

mkyun@mkyun-X7967T:~$ sudo ip addr flush dev enp8s0f1
[sudo] mkyun의 암호:
mkyun@mkyun-X7967T:~$ sudo ip addr show dev enp8s0f1
2: enp8s0f1: <NO-CARRIER,BROADCAST,MULTICAST,UP> mtu 1500 qdisc fq_codel state DOWN group default qlen 1000
    link/ether 80:fa:5b:79:be:e9 brd ff:ff:ff:ff:ff:ff
mkyun@mkyun-X7967T:~$ sudo ip addr add 192.168.1.100/24 dev enp8s0f1
mkyun@mkyun-X7967T:~$ sudo ip link set enp8s0f1
mkyun@mkyun-X7967T:~$ sudo ip addr show dev enp8s0f1
2: enp8s0f1: <BROADCAST,MULTICAST,UP,LOWER_UP> mtu 1500 qdisc fq_codel state UP group default qlen 1000
    link/ether 80:fa:5b:79:be:e9 brd ff:ff:ff:ff:ff:ff
    inet 192.168.1.100/24 scope global enp8s0f1
       valid_lft forever preferred_lft forever
mkyun@mkyun-X7967T:~$ sudo dnsmasq -C /dev/null -kd -F 192.168.1.0,192.168.1.255 -i enp8s0f1 --bind-dynamic
dnsmasq: started, version 2.79 cachesize 150
dnsmasq: compile time options: IPv6 GNU-getopt DBus i18n IDN DHCP DHCPv6 no-Lua TFTP conntrack ipset auth nettlehash DNSSEC loop-detect inotify
dnsmasq-dhcp: DHCP, IP range 192.168.1.0 -- 192.168.1.255, lease time 1h
dnsmasq-dhcp: DHCP, sockets bound exclusively to interface enp8s0f1
dnsmasq: reading /etc/resolv.conf
dnsmasq: using nameserver 127.0.0.53#53
dnsmasq: read /etc/hosts - 7 addresses
dnsmasq-dhcp: DHCPDISCOVER(enp8s0f1) bc:0f:a7:00:3e:81
dnsmasq-dhcp: DHCPOFFER(enp8s0f1) 192.168.1.175 bc:0f:a7:00:3e:81
dnsmasq-dhcp: DHCPREQUEST(enp8s0f1) 192.168.1.175 bc:0f:a7:00:3e:81
dnsmasq-dhcp: DHCPACK(enp8s0f1) 192.168.1.175 bc:0f:a7:00:3e:81 os-122144000479
1.Ouster와 인터페이스 모듈까지 연결을 해두고 전원을 킨다.
2.랜선을 컴퓨터와 연결시킨 후 Network 설정을 통해 임의의 IP,Gateway 설정 ex) 192.168.100.1 , 255.255.255.0 나머지는 건들지 않고 그대로 적용하고 터미널에서 ifconfig 입력하면 연결된 것을 확인할 수 있음.
ouster sample
git clone https://github.com/ouster-lidar/ouster_example.gitclient rviz ros 폴더만 ros workspace공간에 넣어준다.
sudo apt install build-essential cmake libglfw3-dev libglew-dev libeigen3-dev libjsoncpp-dev libtclap-devhttp://github.com/ouster-lidar/ouster_example
ouster-lidar
ouster-lidar has one repository available. Follow their code on GitHub.
github.com
실행 전 Binding을 해줘야 연결이 되는듯 ?
sudo dnsmasq -C /dev/null -kd -F 192.168.1.0,192.168.1.255 -i enp8s0f1 --bind-dynamicroslaunch ouster_ros ouster.launch sensor_hostname:="192.168.1.175" metadata:=meta.json udp_dest:="192.168.1.100"
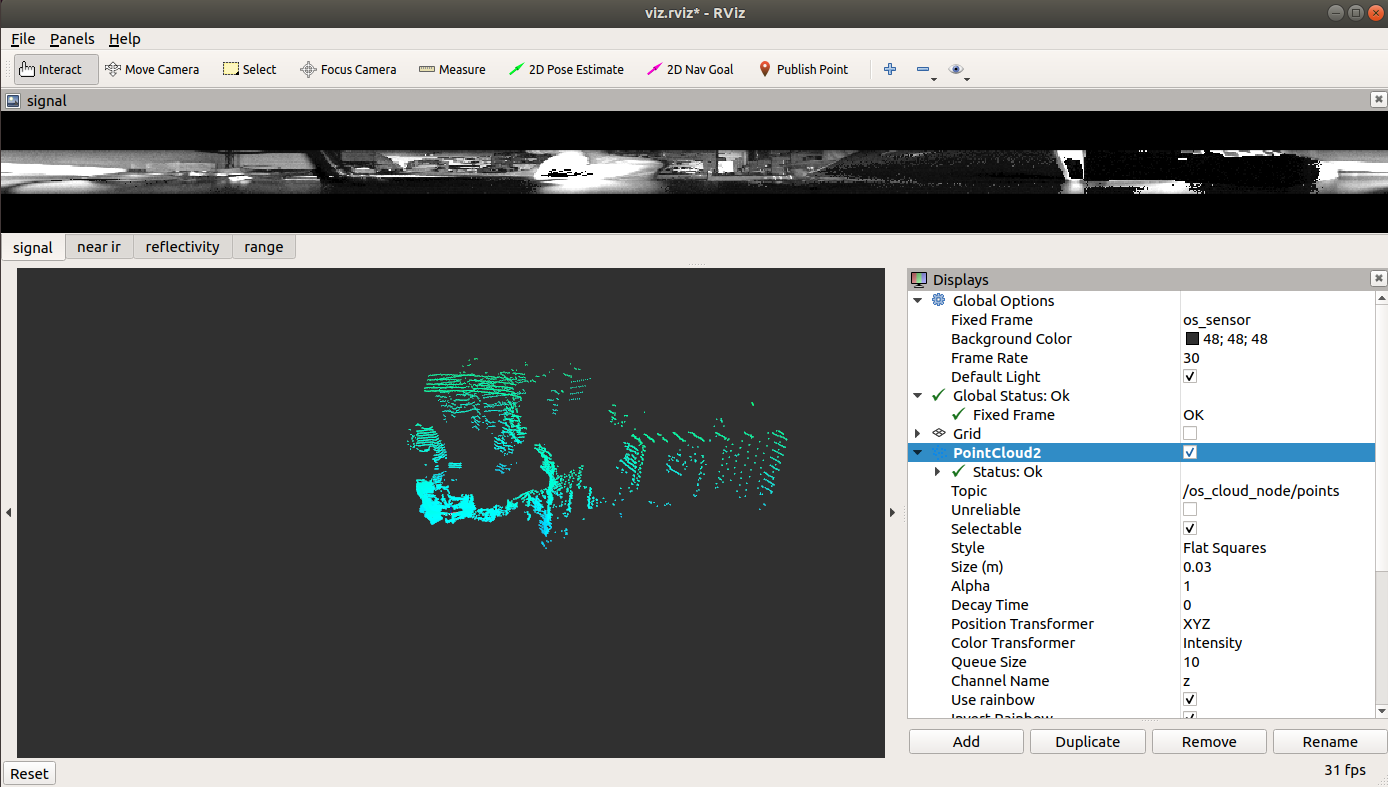
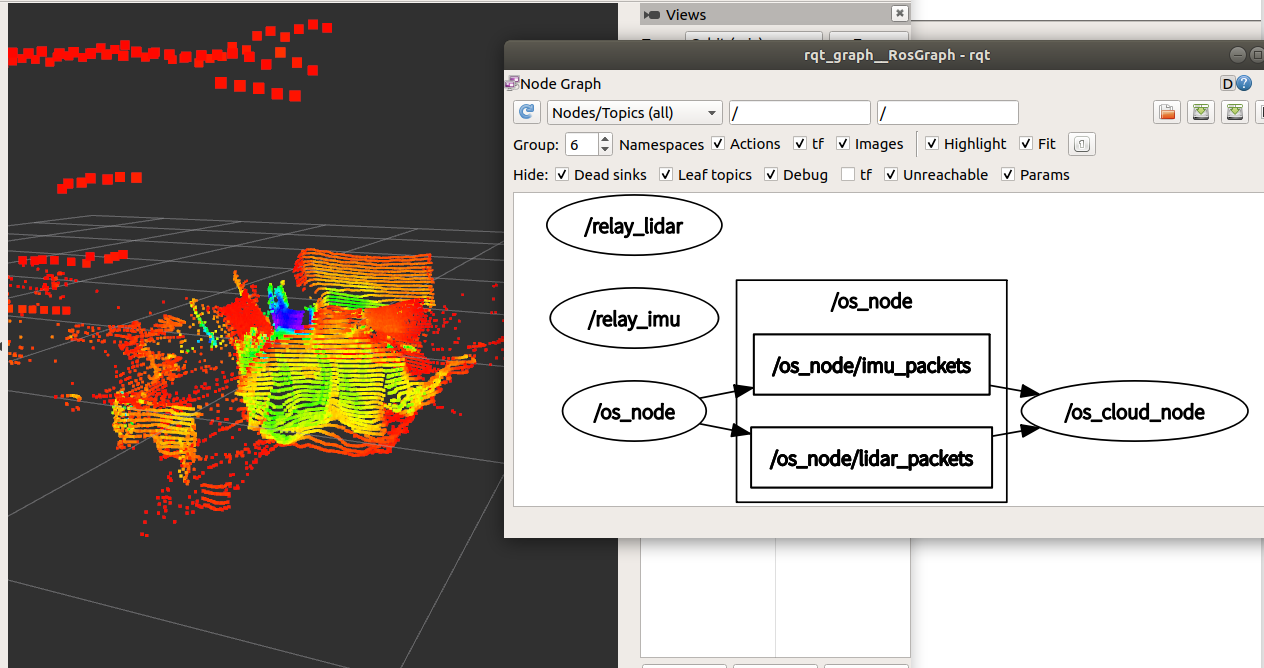
그냥 위 코드를 그대로 실행할 경우 위 사진과 같이 rviz가 자동으로 켜진다. 따라서 ouster.launch 파일을 수정해서 rviz 관련된 코드를 지워주고 재실행 하니까 topic만 퍼블리쉬 되는것을 확인 할 수 있다. 그리고 publish된 topic을 따로 rviz를 띄워서 확인 하였다.
'maengkyun > Robotics' 카테고리의 다른 글
| [Review] Fast Depth Completion on the cpu [추후 수정] (0) | 2022.01.07 |
|---|---|
| [ROS]Point Cloud Library Test (0) | 2022.01.07 |
| [TEST Video] Aritificial Potential Field (0) | 2021.09.05 |
| assda (0) | 2021.08.31 |
| Camera Lidar Calibration [정리중] (0) | 2021.07.16 |