처음 CNN을 접하면서 Sliding window 개념에 대해 배웠다.
이미지내의 요소들을 뽑아 feature map을 형성하기 위해 Kenel이라는 일정한 크기의 배열을 만들어주고 이미지에 Kernel을 sliding하며 convolution하는 것을 많이 봐았지만 sliding window 자체를 구현 해보는 것은 처음이다.
Sliding window algorithm은 배열내에 데이터가 존재하고 해당 배열의 일정 범위에 존재하는 데이터 요소들을 다루어야할 때 유용한 것 같다.
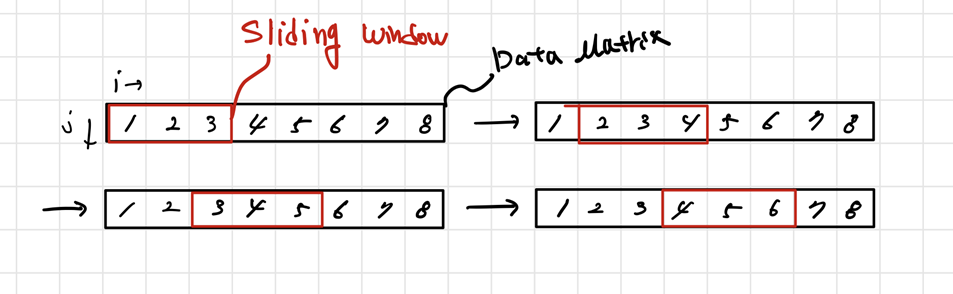
개념에 대해서 간단히 그려보았다.
빨간색 직사각형이 데이터를 sliding할 배열이고 검정색 직사각형 내에는 8개의 데이터가 들어있다.
빨간색 직사각형은 검은색 배열을 한칸씩 sliding하며 Data를 뽑아낼 수도 있고 연산을 시켜볼 수도 있다.
위와 같이 1,2,3,4,5,6,7,8이 담긴 배열에

아래와 같은 Mask를 Sliding 하며 더해보는 예제 첨부

#1D Mask
import numpy as np
Array=np.array([1,2,3,4,5,6,7,8])
mask = np.zeros(3)+0.5
max_window = Array.shape[0]
now_window = mask.shape[0]
min_window = 0
while(1):
	if max_window <now_window:
		break
	print(Array[min_window:now_window]+mask)
	now_window+=1
	min_window+=1
2D Mask 확장


import numpy as np
import matplotlib.pyplot as plt
from PIL import Image
from PIL import ImageDraw
Array = np.ones((10,10))
mask = np.zeros((3,3))+0.5
max_window = np.array([Array.shape[0],Array.shape[1]])
now_window = np.array([mask.shape[0],mask.shape[1]])
min_window = np.array([0,0])
while(1):
    if max_window[1] <now_window[1]:
        break
    if max_window[0] ==now_window[0]:
        now_window=[mask.shape[0],now_window[1]+1]
        min_window=[0,min_window[1]+1]
    Array[min_window[0]:now_window[0],min_window[1]:now_window[1]]=Array[min_window[0]:now_window[0],min_window[1]:now_window[1]]+mask
    image = Image.fromarray(Array).convert('RGB')
    draw = ImageDraw.Draw(image)
    draw.rectangle([(min_window[0],min_window[1]), (now_window[0],now_window[1])], outline="blue",width=1)
    now_window[0]+=1
    min_window[0]+=1
    plt.imshow(image)
    plt.show()
-maengkyun-
'maengkyun > CV' 카테고리의 다른 글
| [Computer Vision] 2D Convolution - python code (0) | 2021.12.12 |
|---|---|
| depth (0) | 2021.11.28 |
| ZED2 stereo camera python api setup (0) | 2021.11.27 |
| 끄적 (0) | 2021.08.25 |